Showing posts with label Cuttlebug Challenge; dry embossing. Show all posts

Saturday, October 31, 2009

Trick or Treat Trio

Happy Halloween girls! It's been busy around here getting ready for this big day. DH introduced my little man to the 1960s Batman show a few months ago, resulting in an infatuation with Batman and Robin. He loves them both so much that he'll put on a blue Batman glove and a green Robin glove and be "Batman & Robin" at the same time. It worries hubby some but I just figure it's a great demonstration of problem solving! He's just like his momma --- can't pick just one!!

I have a few Halloween cards to share with you today. I created these back in February for a magazine call and they weren't selected. I decided to just hold on and post them at the actual holiday!!


This one was my favorite that I did. My sweet friend Suzanne lent me her folder. I embossed it, then used a brayer and a glue pad to apply adhesive to the raised areas. Sprinkled it with glitter. Then spent a crazy amount of time with a small brush getting excess glitter off! LOL!! The sentiment was computer generated and I also embossed the heart.

This is a little treat holder that I made. I inked the raised area on the folder using a craft white pad and then embossed it. I added googlie eyes to represent a big icky spider just lurking in that web, waiting for his next meal. Being a Texas girl, I have seen my fair share of spiders with eyes that must have been that big!

Or at least really close!! *wink*


I wonder if spiders like chocolate?

This is the last one I created. I embossed the base and then brushed it with my craft ink pad to highlight the dots. LOVE that Swiss Dots folder. The strip was trimmed from an embossed sheet, inked and then some googlie eyes added to the boo at the bottom.

I hope you have a great time tonight! Our pumpkin is carved, our candy bought and we will take our little guy out early and hopefully be back in time to greet trick-or-treaters at our house. We don't get very many which is kinda sad!

Friday, May 8, 2009

Cuttlebug Spa Weekend Winner

I have the winners of my lavendar goodies from the Cuttlebug Spa Weekend hosted by the Cuttlebug Challenge. Thanks so much to everyone that joined in and shared the love of the little green 'bug with us! I'm sorry it's taken until FRIDAY to get this posted! Geesh! Bad blogger!!

Here is the first winner:
Kelli said...
Lavender is very calming, great flower choice!

and then for the second set:
Christi said...
I love your cards! Especially love the turtle drawing your little guy did!
Congrats ladies! Email me your address and I'll get your prize package out to you! My email is:
casserole14 at gmail dot com
Maggie, owner of Cuttlebug Challenge, will be posting winners for the daily giveaways tomorrow! One of which is my bangle bracelet giveaway!
Thanks again! I am truly honored that so many of you would stop by for a visit, take the time to comment and follow! I'll be spending some time over the next few weeks to visit each of you!
Have a beautiful weekend ladies!

Saturday, May 2, 2009

Bride Shopping Tags

Hello girls! Are you enjoying all the great inspiration over at Cuttlebug Challenge? If you haven't been by yet today, be sure to visit. Jennifer McGuire is joining us as our Special Guest Designer and has a great challenge for all of us.

Today Meda, Eva and I also created some wonderful wedding projects. Here's a little peek at mine!

This was very easy to create! It's a simple treat pull pouch. I found the little "like it" and "love it" tabs at Michaels in the bridal section. If you would like to create a similar project, here are some simple instructions for you.

Materials needed:
cardstock
assorted flowers
red liner tape
cuttelbug and embossing folder
glue dots
ribbon (36" in length is what I used. More than enough but I wanted to have lots to tie my bow. You could probably get by with 24")
1. Cut cardstock to 7 1/2 inches by 6 5/8 inches for the pouch. The insert measures 2 3/4 inches by 6 inches. Score at 2 inches and 5 inches on the long side.
2. Emboss cardstock. Apply red liner tape along the bottom outside flaps and along on of the short sides. Fold and close pouch.
3. Decorate outside with sentiment gem sticker. Flowers are created by layering silk flowers together. Use glue dots to assemble and adhere to pouch.
4. Adhere tags to insert using glue dots. Tie ribbon around insert with the bow at the top. Insert into pouch.
There is also a giveaway over on the Cuttlebug Challenge blog today. I'm giving away this beautiful pave bangle bracelet to one of our lucky followers! Be sure to visit the CBC blog and see the other projects and get entered to win! Think about how prettily it will sparkle at a special event - or while you craft!! ETA: The post at CBC is scheduled for 1 PM my time - and I goofed when I scheduled this! And it's showing 5/3 as the date. Sorry girls! I really thought Sat. was our day!


Thanks so much for stopping by! I've so enjoyed your visits and comments and the little bits you share about yourselves with me!
Have a beautiful day!!

Wednesday, April 1, 2009

Be Inspired #25: Sheetload Shortcut Shoutout

Hm - say that three times fast!!! LOL
This week Alicia from Sheetload and Shortcuts is the sponsor over at the Cuttlebug Challenge blog. It's an intersite challenge as the Sheetload team is also revealing the new issue. We were given some of the acetate and frosted blanks to play with this week. I have to say, I thought that I had really good acetate sheets until I got these in the mail. They are a wonderful thickness and emboss beautifully!

I used the Textile folder to emboss the clear card base and eliminated a layer as I really wanted to see through the card. I used my ink pads and waterbrush to color my image before mounting to the Raspberry Tart paper. My sentiment was trimmed closely and added without matting to my card. Two hot pink gems finish it off.

Be sure to visit the Cuttlebug Challenge blog to see what the rest of the team created. You won't be disappointed. You can also view the sketch. Sheetload is providing the prize this week - some wonderful card blanks. Be sure to leave your creation using the sketch in Mr Linky at the CBC blog. And visit the Sheetload blog too to see the new issue and what their team came up with using the same sketch!!

If you haven't taken the survey regarding the Cuttlebug and what you'd love to see in future releases, be sure to do so. Be sure to follow the blog too - one there are 1000 followers, more sneak peeks will be revealed and prizes will be given away!!

Keep scrolling to see my Flutter By work for this week!

Friday, February 20, 2009

Faux Leather with Fun Foam

Happy Friday girls! Are you so excited that the weekend is here? I have had a busy but great week and am looking forward to the weekend as well. I do have to work for a little bit on Saturday but hope to get some time to stamp too as there are several challenges that I want to participate in.

Today I was responsible for the tutorial over at The Cuttlebug Challenge. Please head over there and see it!! I'll wait for you to get back and show you my other example for today.

Hi again! I wanted to create a more masculine card to have on hand and for some reason the faux leather idea popped into my head the other morning as I was trying to catch a few more zzzz's. There are many variations on how to achieve this; here's a peek at what I came up with.

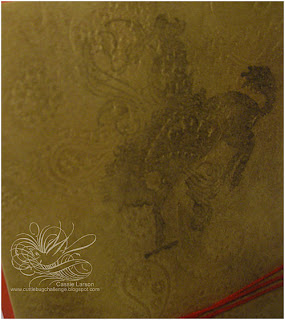
I started by running some light tan fun foam through my cuttlebug using the Paisley embossing folder. Then I took my Old Paper vintage ink pad and brushed it over the foam using the direct-to-paper method. I used a stipple brush to swirl on vintage photo covering most of the foam. I finished by adding Walnut Ink by pouncing it in just a few places as a highlight. Here it is all finished:

Since it was a masculine card, I wanted to keep it very simple. I stamped the cowboy image using Memento Brown directly on the fun foam. Some red string and a button to add some interest at the bottom and it was finished. I glued the fun foam panel to my red base using Tombow Mono Glue - in the bottle with the green cap.

View from a different angle. I hope you can see the texture. It's sooo cool looking in real life!!

And some close up shots.
That's it for me today! I am so thrilled that you stopped by. Let me know what you think of the embossing on fun foam. And if you try, please let me know where to find it as I'd love to see what you create!
Have a beautiful weekend! I hope to be popping back on here with some challenge cards!