Showing posts with label gift ideas. Show all posts

Wednesday, May 12, 2010

A Color Book with Texture

Happy Wonderful Wednesday girls! Be sure to scroll down for my Diedrich Dare card today too!

Up first is my Cuttlebug Challenge project for today. This week we were to supposed to make something with the kids in mind! I thought and thought and was coming up blank. And then I woke up early one morning and as I was dozing, hoping to go back to sleep, an idea came to me. I'm really, really happy with how it came out. And it was came together QUICK!

Here's a look at each page in case you are interested.

 I assembly-lined each step as much as I could. Cut the Kraft bases. Then cut the circles using my Cuttlebug and a Spellbinders die. Then embossed them all. Adhered and stamped the names. Attached the eyelets. Doing it that way made it much quicker than doing one page at a time.

I do think this would be a neat gift for a new mom or a 1st birthday present. I can absolutely see myself making some more of them, adding different themes as well. I do think in the future I will laminate them before adding the eyelets so that a little one could knaw on it without paper disintegrating --- ewww! We all know that it only takes a second with your back turned for them to do something like that!

Be sure to swing by the Cuttlebug Challenge and see what the other girls came up with!

Here are the embossing folders that I used:
Swiss Dots, Houndstooth, Argyle, Swirls, Spots & Dots, Owl Flourish, Perfectly Paisley, Allegro, Snowflakes, Oriental Weave, Heart Blocks

And don't forget to scroll down for my Diedrich Dare card today!

Monday, February 1, 2010

CHA Winter 2010 Projects: Gifts from the Kitchen & Fourth of July

I just saw this sitting in my post lineup - in draft mode, I didn't even realize it hadn't posted!

I'm so excited to finally get to share the projects that I created for the Provo Craft booth at CHA this past weekend. Thank you so much Provo Craft for the chance to work with you! Thank you also to Maggie for all the help you give us and for representing the entire team at CHA! I would also like to send out a sincere thank you to Provo Craft for the chance to work with the new folders, Coredinations for their sponsorship and providing cardstock and to Adornit for the great patterned papers you sent to design with as well!
♥♥♥♥♥♥♥♥♥♥♥♥♥♥♥♥♥♥♥♥♥♥♥♥♥♥♥♥♥♥♥♥♥♥♥♥♥♥♥♥♥♥♥♥♥♥♥♥♥♥♥♥♥♥♥♥♥♥♥♥♥♥♥♥♥

Maggie asked me to create projects in two themes: Fourth of July and Gifts from the Kitchen.  I'm going to start with my Gifts from the Kitchen sets.

When she asked me to create some items to fit this theme I knew right away what I wanted to do! My first project is for Firecrackers! My mom made this at Christmas this year and they have been an instant hit with the family! My husband is a big fan and we've made several batches since the holidays. They are very easy and a great snack!
I really wanted the firecrackers to show through and so I found this box that they could stack nicely and neatly in (I hope they traveled well) and then just made a simple band to wrap around the middle. I embossed some red Coredinations paper using one of the new Asian folders debuting at CHA. I opted not to sand on this project and just let the design remain very crisp. The sentiment was generated on my computer and punched out; there are so many you could use with this recipe - "You're on Fire!" "You're Hot!" - you get the idea! The firecrackers were sooo simple! I just took some metallic pipe cleaners, cut them down and rolled them up in some of that Adornit patterned paper.
Supply List: Asian embossing folders (Provo Craft), cardstock (Coredinations), patterned paper (Adornit), punch & ribbon (Stampin' Up!), glue dots, red sticky tape, pipe cleaners, box - I found at the comic book store.

Firecrackers Recipe:
1 box of unsalted saltine crackers (we prefer the generic over the name brand for this)
1 1/2 c. of canola oil
3 Tablespoons of crushed red pepper flakes
1 packet Ranch Dressing mix

In a large sealable tub, place all the crackers. In a separate bowl, mix the remaining ingredients well. Pour over crackers. Seal and turn tub gently to coat crackers. Turn the tub every 15 minutes for an hour or so. Open tub and let air dry for a bit.

♥♥♥♥♥♥♥♥♥♥♥♥♥♥♥♥♥♥♥♥♥♥♥♥♥♥♥♥♥♥♥♥♥♥♥♥♥♥♥♥♥♥♥♥♥♥♥♥♥♥♥♥♥♥♥♥♥♥♥♥♥♥♥♥♥

My second Gift from the Kitchen was to make Teriyaki Walnuts. I packaged them in a box using a template from My Time Made Easy. I used two of the new Asian folders on this project and love how simple yet "wow" it looks! Since my box base was white, I sanded the Coredinations cardstock on this project to bring in some white on the decor as well. The box is kept closed with some velcro circles.
And then here's the back of the box; I think it's a nice touch to finish it all the way around.

Supply List: Asian embossing folders (Provo Craft), cardstock (Coredinations), patterned paper (Adornit), punch & ribbon (Stampin' Up!), red sticky tape, sanding block, velcro closure

♥♥♥♥♥♥♥♥♥♥♥♥♥♥♥♥♥♥♥♥♥♥♥♥♥♥♥♥♥♥♥♥♥♥♥♥♥♥♥♥♥♥♥♥♥♥♥♥♥♥♥♥♥♥♥♥♥♥♥♥♥♥♥♥♥

My final Gift from the Kitchen is a thank you gift for someone who's just been a great friend. There are tons of "gifts in a jar" recipes out there that are easy to put together. This is for Confetti Bean Soup. You are supposed to layer the beans which looks really nice. But I knew that they would get all mixed up in route to CHA so I just mixed them to begin with. I think it works since it's "confetti".
I kept the jar itself pretty simple - just an embossed circle to cover the top, some ribbon and a really neat tag. The embossing just looks so sharp in this little slide frame.
The card is more in-depth. I used another new Asian folder for the main embossing, again on Coredinations cardstock. Instead of sanding, I distressed by lightly inking the paper with some black ink and distressing the edges. The little sentiment panel uses a graphic from Crafty Secrets. The inside of the card features the instructions on a pull out card.

Supply List: Asian embossing folders (Provo Craft), cardstock (Coredinations), stickers (Making Memories), Crafty Secrets, frame & glass slides (Ranger), black ink, edge distresser (Heidi Swapp),
ribbon (Stampin' Up!), brads,
♥♥♥♥♥♥♥♥♥♥♥♥♥♥♥♥♥♥♥♥♥♥♥♥♥♥♥♥♥♥♥♥♥♥♥♥♥♥♥♥♥♥♥♥♥♥♥♥♥♥♥♥♥♥♥♥♥♥♥♥♥♥♥♥♥
Okay, now let's shift gears and jump ahead about 6 months. Fourth of July is one of my favorite holidays; I'm so proud to be an American - thankful too - and the patriotism that swells at that time of year just makes me happy!

The first project I'm going to share is a decorated insulated mug. I wanted to create a mug appropriate for a military wife - they sacrifice so much as well for our country. I'm incredibly grateful and thankful for the journey they take to support their husband as they do battle on my behalf.
That being said, this project gave me such grief. I  was literally like "Good Grief" (charlie brown).
What I have to share is the 3rd version of this project that I did.
I used some star printed paper on the bottom, embossed with the stars embossing folder and then brushed with white craft ink. The top had a blue patterned paper and then I cut up bits to create some sentiments.

Supply List: Stars embossing folders (Provo Craft), cardstock (Coredinations), patterned paper (Adornit), red sticky tape, insulated coffee mug
♥♥♥♥♥♥♥♥♥♥♥♥♥♥♥♥♥♥♥♥♥♥♥♥♥♥♥♥♥♥♥♥♥♥♥♥♥♥♥♥♥♥♥♥♥♥♥♥♥♥♥♥♥♥♥♥♥♥♥♥♥♥♥♥♥
My next project is a jewelry piece that I created with another frame and glass slides from Ranger.
I embossed Coredinations paper, and then trimmed out the Statue of Liberty image from the Adornit paper. Computer generated sentiment. I layered that all on one glass slide and inserted in the frame. Then I covered it with some crackle medium --- which makes it very difficult to see the embossing in the photo now. While it was still wet I sprinkled in some glitter flakes I had to mimic fireworks!
This is the first project I've made with these materials and it was a lot of fun! Very easy and I can't wait to get some more frames!
Supply List: Asian embossing folders (Provo Craft), cardstock (Coredinations), patterned paper (Adornit), frame & glass slides & crackle medium (Ranger), glitter flakes, chain
♥♥♥♥♥♥♥♥♥♥♥♥♥♥♥♥♥♥♥♥♥♥♥♥♥♥♥♥♥♥♥♥♥♥♥♥♥♥♥♥♥♥♥♥♥♥♥♥♥♥♥♥♥♥♥♥♥♥♥♥♥♥♥♥♥
I picked up a wooden star box at Michaels. I thought it would be a wonderful little keepsake box for dog tags. The box was painted and then patterned paper cut to fit the top. I embossed it using just the swirls from the Koi embossing folder. You'll have to look close to see it as it flattened out quite a bit when I was adhering the paper to the top.

I also cut out some other icons and words from the Adornit paper to decorate the box - including a sentiment on the inside.


Supply List: embossing folder (Provo Craft), patterned paper (Adornit), acrylic paint, glue, dimensionals
♥♥♥♥♥♥♥♥♥♥♥♥♥♥♥♥♥♥♥♥♥♥♥♥♥♥♥♥♥♥♥♥♥♥♥♥♥♥♥♥♥♥♥♥♥♥♥♥♥♥♥♥♥♥♥♥♥♥♥♥♥♥♥♥♥
My final project is my favorite that I created: a decorated canvas. The shipping tags were embossed with the stars folder and trimmed in length a bit to fit the canvas. I looooove how those manila tags look embossed - it might be my new favorite thing to emboss!
I had some chipboard letters in my stash that I peeled the paper off of and recovered with the Adornit papers. I sponged some ink around the edges to distress them a little bit. For the fourth tag, I cut out a star and embossed it with the swiss dots folder. I sanded them as I really wanted them to stand out. Using a sentiment trimmed from the paper and button and twine I decorated the star for a little fancy ending!


Supply List: embossing folders (Provo Craft), patterned paper (Adornit), cardstock (Coredinations), manila shipping tags, dimensionals, button, thread, paint, sanding block, canvas
♥♥♥♥♥♥♥♥♥♥♥♥♥♥♥♥♥♥♥♥♥♥♥♥♥♥♥♥♥♥♥♥♥♥♥♥♥♥♥♥♥♥♥♥♥♥♥♥♥♥♥♥♥♥♥♥♥♥♥♥♥♥♥♥♥
If you've read this far - THANK YOU! There was a lot to share and I am so appreciative that you take the time to visit - please leave a comment letting me know what you think! Which project is your favorite?

Sunday, November 22, 2009

Festival of Lights - Gingerbread House

Good Morning!!
If you are looking for my Festival of Lights Blog Hop post and Video Blog Hop post - please scroll down!

Today I have my featured post from the Cuttlebug Challenge blog!


Cassie here this morning to kick off the projects for today. Several of the Senior Design Team will be sharing projects centered around the theme of
Santa's Sweet Shoppe.


One of the traditional symbols surrounding the Christmas season is the Gingerbread House. I love the smell of gingerbread - in cookie or cake form! I don't remember ever decorating gingerbread houses as a child but my mother-in-law has done it with her grandkids for as long as I can remember. My little man (not quite 2 last year) got to "help" last Christmas --- which was eating more than anything! One thing I've always been amazed at is the willingness of people to put so much effort into something that is just thrown away after the holiday. But a gingerbread house out of paper would last from year to year!


Supplies:
house form/box/template

decorative papers

Cuttlebug & embossing folders (Victoria, Snowflake)

craft knife

strong adhesive

liquid adhesive (Crystal Effects)

glitter (Perfect fX in Sparkling Champagne)

ink

trims - lace, buttons, pearls


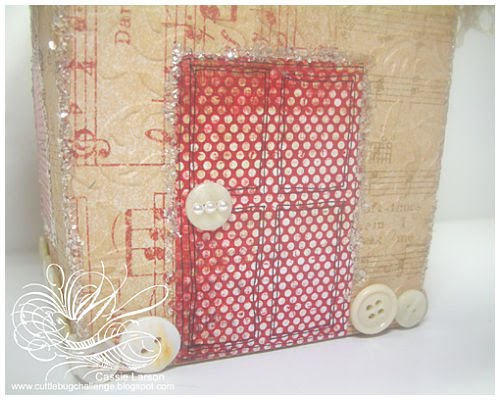
I started with a box I found in the shape of a gingerbread house. It contained cookie cutters but I bought it for the form!

After opening the box at the top, I peeled off the slick printed layer of the house. I wanted a good surface for my adhesive to adhere to and also didn't want any of the printing to potentially show. After that, I used an inkpad to add color to all the edges that matched my base paper.


I cut my paper into strips and embossed them using my Cuttlebug and embossing folders. The roof paper was sanded to reveal the white core of the paper. The siding was lightly rubbed with the ink pad to bring out the embossing. The edges were also inked on the side pieces.


Then came the fun part - adding in all the details! I used a third patterned paper for the door and windows, using a pen to add some detail. Instead of traditional "candy", I used "candy" that crafters find "yummy"! Buttons along the base, pearls on the roof.


I used Crystal Effects along the edges of the sides and the windows/doors and then sprinkled it with glitter - some Perfect fX flakes I have from when I first started stamping.

And a final closeup shot - can you see the embossing on the sides? This was really easy to make since I already had a form to use. It was just a matter of cutting, embossing, adhering and decorating! One thing I wish I'd done was go over *all* my edges on the room instead of just the two ends. But I'll just remember that for the next one!


I hope you enjoyed my project today!

Have a beautiful day!! ~Cassie

Wednesday, September 9, 2009

Cuttlebug Be Inspired 48: Gift Bag & Card

Post #1
We are continuing our 1 Year Birthday Celebration at the Cuttlebug Challenge Blog! This week it's all about the GIFTS!! What's a birthday without gifts? (You can see my invite here).

In keeping with my '50s Sock Hop/Grease theme, I used some very classic 1950's Grease colors: pink, white and black and of course, kept it really simple!

The bag is actually a bag that has a company logo along the bottom! I just covered it up with paper!!

Here's a close-up shot of the bag decoration! "It's Your Party" is a little play on words; maybe you remember that song from the '50s "It's My Party" --- well, just a little twist and it's perfect!

And then here is the close-up of the card - same paper, same embossing, same border punch. I kinda makes me think of those crinoline (?) underskirts they would wear under the poodle skirts so they would stick out. Again, my sentiment is another well known '50s song!

Thanks for checking in this morning!! Be sure to visit the Cuttlebug Challenge blog and see all the other wonderful creations by the team!

Wednesday, July 29, 2009

Flutter By Wednesday: Pearl Monogram

Good morning! Wednesday's are special because it's Flutter By Wednesday. Danni came up with Flutter By Wednesday over a year ago and challenges us all to create cards/projects with a butterfly on it. She even expanded it to include fairies earlier this year as they flutter and are special too!

Ann is our hostess this week and requested that we use NO patterned or decorative paper. I created a little decorative element. I picked up this pearl letter in the Michael's dollar bin awhile back. I just added some pink butterflies to it.

I think it'll be so pretty tied to a package or gift bag. Or hanging from a little knob on a dresser. I hope the recipient likes it!

Have a great day! My Cuttlebug Challenge card is also going to past today so I hope you'll stick around to see that too!

Wednesday, December 3, 2008


Happy Wednesday everyone! That means it's time for another challenge for the Pink Papery Studios DT. Lorelie and Lindsay both suggested that we create a handmade gift. I used one of the Sista's images, Cindy Lou, this week. She looks so happy to be vacuuming and she's all dressed up for it too! It totally made me think of those kitchy 1950's images you see with the sarcastic sayings so I wanted to create my own kitchy card! And as everyone who knows me well would vouch, I'd rather be stamping that vacuuming!! But if I had one of those fancy Dyson vacuums, well, I might dress up for the occasion!!

I used a paper bag as my card base this week so I could tuck the cider mix into it. I think this would be a neat card to send to a long-distance friend with an invite to share a cup of cider and catch up; with all the virtual options these days, it could easily happen!! I also think this would be a neat card for a friend who was ill or recovering from surgery - you could offer to vacuum for her and then share the cider afterwards.


ETA: When I started this challenge I was going to make a completely different gift (you'll just have to wait to see it) but I didn't have the shade of CS I needed and rather than brave the cold, I just decided to make something different. Picked my image, had an idea and went with it. When I uploaded my project to the DT blog, I saw - really, re-saw but that's not a word - Jessica's gift - and mine is almost the same. I bet I was subconsciously channeling her!! I hope she doesn't mind!! Stop by her blog and see her cute gift!! And you'll realize that she's so sweet, she doesn't mind how close our projects were!!
Hope you are having a marvelous day!! It was C-O-L-D and very windy here this morning. But the wind has calmed down and so it's not so bad out now.

Tuesday, December 2, 2008

All Wrapped Up


Amy, the owner of Pink Papery Studios, challenged the DT to use one of the new images last week. I know most Christmas trees are green, but my sister fell in love with a purple tree when we went to Canadian a few months ago. As a newlywed, it wasn't in her budget to get it, but she has talked about it a lot since then! So I colored my tree purple for my project. My sis also loves bright, bold colors and I imagine that this is her, wrapping gifts this holiday season. I took a toy container that my hubby was going to through away and re-purposed it! One of her first jobs was to wrap gifts at a local gift store. She wraps presents BEAUTIFULLY! SO I loaded it with all kinds of goodies that she can use to finish off her packages - bells, bows, candy canes, tags and even a purple pen!! I guess if she can't have the tree, she can have purple presents!!