Showing posts with label tutorial. Show all posts

Sunday, July 12, 2009

SUPER-Sized Sunday!

Hello girls!! I've got 2 items to share with you today so it's a SUPER-Sized Sunday!!

First, I have a project over at Cuttlebug Challenge today for the Creatively Yours Spotlight Sunday feature. I hope you click on the picture below and go check it out in its entirety! I used the new Victoria embossing folder as part of our month-long Countdown to CHA event!


My second thing to share today is of course Banana Split Sunday! There is a new release coming up on Wednesday, July 15th. This week is a sketch challenge; you should play along as you could win your choice of one of the new sets.
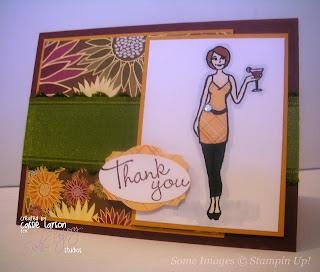
This month we are introducing a new illustrator for 2RedBananas: Mindy Baxter. I used her Princess themed set for my card today. Image was colored with my prismas and baby oil and the dress was paper pieced. Lots of sparkly gems as every princess should have!

Stop by the 2RedBananas blog to see the sketch! Be sure to link up your creation in Mr Linky for your chance to win one of the new sets. The rest of the Banana Bunch is sharing sneak peeks all week long so visit their blogs too!

Saturday, July 11, 2009

Stamping with your Embossing Folders

I have two exciting things to share with you today!

First, 2RedBananas will be releasing 5 new sets next week on July 15th. More Quotes features 3 quotes, one of which I've featured on my card today.

Second, I discovered a new use for my Cuttlebug embossing folders --- you can use them as a "stamp" and create lovely patterned papers. To view the tutorial, head over to the Cuttlebug Challenge (ETA: tutorial on THIS POST or click the picture above)! Here's a close-up shot of my panel before being trimmed for my card.

I used a card sketch from Technostamper who posts her Lunchtime Sketches on Monday. Thanks for stopping by!
Be sure to visit the rest of the 2RedBananas team to see The Week of Peeks. There is a new illustrator launching 3 sets that are super cute! We also welcome a new guest designer for the next few months. Her blog is wonderful --- check it out!!

Saturday, May 9, 2009

Banana Split Sunday: Glitter Me Silly

It's time for another Banana Split Sunday challenge over at 2RedBananas! This week we want you to use glitter in your card or project today. Loose glitter, glitter paper, stickles - anything with glitter in it counts!!

This is also a prize week which means you have a chance to win your choice of one container of glitter. You can check them all out HERE!!

I wanted to create something besides a card and used some simple supplies to create a little bookmark. See that ribbon? It's the most wonderful velvet ribbon! In my opinion, velvet is one of the greatest inventions ever! And Jeanette has some in the store along with lots of other great ribbons too!

Here's another shot of the bookmark. I actually made two of these to give away as little gifts. I hope the recipients enjoy them! The verse is part of The Gift, a set that was released with Easter in mind but that has uses throughout the year.

If you'd like to achieve this look in glitter, it's very simple! Here's what you'll need for this technique:
Transparency/Acetate sheet
StazOn Ink
Cardstock
Xyron
Loose Glitter
*Stamp image/sentiment on transparency using StazOn ink.
*Run through your Xyron machine applying adhesive to the back.
*Cover with glitter.
*Run through your Xyron again, applying adhesive again and then attach to your cardstock base.
Be sure to visit the rest of the Bananas and see their glitter projects. I've been able to have a little sneak peek and they are super fun! Lots of wonderful details and shiny glitter!
Today kicks off the week of peeks for the May Releases at 2RedBananas. So be sure to come back around to see those!

Wednesday, April 22, 2009

Cuttlebug Be Inspired Challenge 28: Home Sweet {Welcome} Home

Happy Wednesday morning!! This is my second post for today. I hope you'll scroll down to see my Flutter By card too! I'd love to hear what you think of it!

This week the theme over at Cuttlebug Challenge is HOME SWEET HOME. We were sent the most delicious papers from Marks Paper Company to work with this week. My project today features papers from the Old Fashioned Courtship Collection. It's a really cool mix of Vintage, Traditional and Contemporary designs. Not only that but it's a nice, sturdy double-sided paper equivalent in quality to Basic Grey. I'm sharing that with you because I had never heard of Marks Paper until a few weeks ago as we started working on this challenge --- maybe it's new to you too? I loved using it and I'm thrilled to have some left to play with! If you've never visited the website, I really encourage you to do so. You can see lots of stuff that their design team has done.


Here's what I came up with:

I knew that I wanted to try to create some sort of "home" image but wasn't sure what to do exactly. As I began sketching out a design, I remembered all those flower pot cards I've seen over the last few weeks and I thought it would be really neat to have a home designed with a pull feature and so my {Welcome} Home Pocket Card was born! Since my measurements are completely different from what I saw for the flower pot card, I am sharing the entire process with you!

*Note: All edges were inked with Chocolate Chip ink.
1. Cut base (or "home") from paper to measure 4" x 7 3/4"

2. Score at 3/4" and at 4 1/4"

3. Fold so that the small portion is a "mountain" fold and the other is a "valley" fold.

4. Use a border punch to add interest to the eave or trim. Since my paper is double sided I get a contrasting pattern.
5. Adhere Red Liner Tape to the sides of the large section only. This will close off your card and keep your insert where you want it. Go ahead and close together. I also used a few glue dots to adhere my trim down flat as I didn't like the look of them sticking up.

6. Cut an insert measuring 3 3/8" x 5" for your card from a contrasting paper. Cut another piece from white cardstock to measure 2 7/8" x 3 1/4" and set aside.
7. For the roof, cut paper from a third pattern to measure 1 1/2" x 5". Below you will see a simple trick to ensure that you get matching angles on both sides of your roof. This is also a great trick to use when making your own tags!

8. As illustrated below, trim the right side of the roof at a slight angle. Take the cut off portion, flip it over and line it up over the left side of the room. Trace the angle and then trim that side as well. You can see in the final pic that you have a perfectly matched angle.

9. Insert the base insert into your card and line up where you want your roof.

10. You can see that my roof allows some of the trim to peek out. Trim off the excess that is showing from the insert above the roof line. Adhere the white piece for the insert, lining it up so that is is tucked under the roof.
11. Add decorative elements to house. The doorknob is a decorative brad and the panes are just drawn by hand. Here are the measurements that I used.

Door: 1" x 2"
Upper Windows: 7/8" x 3/4"
Lower Windows: 7/8" x 1 1/4"
Chimney: 3/4" x 1 1/4" (5/8" showing)


12. Use your Cuttlebug and the Welcome Baby combo die set to create the sentiment. You can see how I just trimmed off the "baby" for my project.

Another view of the home with the sentiment showing! I think this would be great to welcome someone to the neighborhood or to even leave out for a guest to welcome them to your home.

Thanks so much for stopping by today! I just love being able to share with each of you!! I hope you'll participate in the Home Sweet Home challenge this week at Cuttlebug Challenge. Marks Paper is giving away a paper pack to a lucky participant!! Use keyword CBI28 if uploading to online galleries. And don't forget to enter the link to your project in Mr Linky at the CBC blog to be entered in the giveaway!
FREEBIE: Marks Paper actually has a FREE digital pack on their website. Really cute patches that you could use for the challenge. Go HERE to get it (click on the photo and the pdf will open. Then just save, print and use!)

One last thing!!! Don't forget that next weekend is the BIG, Cuttlebug Challenge SPA RETREAT event. The 3 days will kick off with a blog hop on Friday. There are lots of projects being put together by the design team and a PLETHORA of PRIZES!! You won't want to miss it!!

Monday, February 2, 2009

{heart} YOU banner

Hi girls! How are you?? I've missed ya'll the last few days. I know I've been MIA - not only here but in visiting you too. Hope to rectify that in the next few days. But oh, have I been busy!! Most of what I've been working on I can't share yet. However, one of my projects has been posted.
Here's a little peak:


This is part of the garland/banner that I created for the Cuttlebug Challenge LUV BUG Event. What a weekend: fun, prizes and the most A.M.A.Z.I.N.G. projects and inspirations ever! My mind is spinning!! I do hope you'll take a little trip over there and see it! I just love looking at it every time I head down my hallway! I'd love to know what you think!

I will have my card up for Madelynn's Twinkling Tuesday tomorrow - although probably in the afternoon so be sure to stop back by!!

Wednesday, November 26, 2008

Thanks Girlfriend

Hey!! It's Wednesday again and that means it's time for another challenge from the Pink Papery Studios design team. This week I wanted to use one of the digital images and I thought I would show the steps to completing my Sista for those of you that may be new to digital stamping!! It's really easy!

1. When you purchase the digi-stamp, you'll receive the image in an email. Save it in a file and you'll always know where it is. I have a file in My Documents labeled Pink Papery Studios which is where I save all my digi images.

2. Open up MS Word (or the equivalent for your computer). You want to insert your digi-stamp into your document. For me, I go to INSERT, then PICTURE, then FROM FILE.
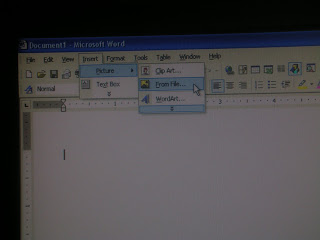
Find your image on your computer. Again, keep them all in one file in your documents for quick and easy access!

This is what you'll have. You can see that the image is really large.

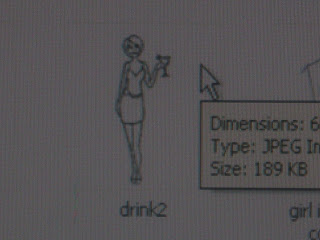
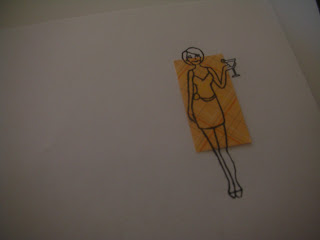
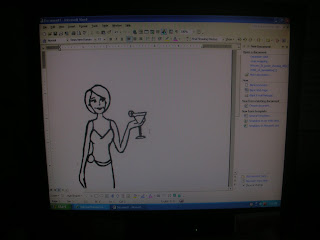
3. One of the great things about digi-stamps is that they can be sized to any project that you have! After you have inserted your image, you will want to re-size it. You can do this by clicking on the image and using the "drag" method. Or you can do it by inputting the size that you want. To do this, select the image by clicking on it once. Then RIGHT-CLICK and select FORMAT PICTURE.
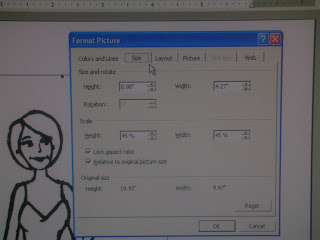
Go to the SIZE tab and change the height or the width to the size that you want. You only change one as they are somehow "connected together" so that they both change proportionally and your image doesn't distort.

Once you have your image to the size that you want, print your image onto your cardstock. If I'm not sure what size I want, I sometimes insert the image several times and size it many different ways so that when I print I have lots of options.

I wanted my Sista to wear a cute tunic so I knew I wanted to paper piece her top. It's very easy to do this with digi-stamps too!! I start by laying a piece of computer paper over my cardstock with my printed image. (You can just barely see it coming through)

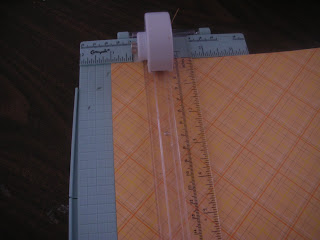
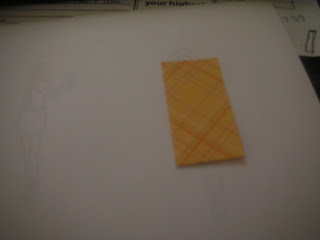
Then I cut the pattern paper that I want to use to size. I only need enough for her top.

Using a glue stick, I glue the PP down on the computer paper, lining it up so that the portion I want to paper piece will print on my pattern paper. It is only necessary to glue down the top edge of your pattern paper. You can use a temporary adhesive but I just use a light swipe of a glue stick that I keep here by my computer.

Insert your paper into your printer and print again. This is what you'll get!


You can just repeat the process as many times as you like for multiple cards or for different papers that you may need.


This week the design team was challenged to make a thank you card. Last week I subbed in my friend's Keno group and had a wonderful time! The hostess served this yummy Thai Chicken pizza and a Bar-B-Que pizza with pomegranate martinis. They were all DELICIOUS!!! Especially the martinis!! So I thought I would send her a thank you and this Simply Sistas image with her drink from Pink Papery Studios is perfect!! She's having a pomegranate martini just like I did!! The original image is just a cute little dress, but leggings are all the rage right now and so I added leggings to her outfit by just coloring in with a black marker! Totally loved how it turned out! And off course, some bling on her belt!! My card is based on the sketch (#204) at SCS this week.
All in all, it took me longer to create this post that it did to make TWO matching cards today!

We'd love to have you play along too! Create a thank you card for someone and be sure to post the link so we can all see it!! Also, stop by the other girl's blogs and see what they have created!! Links are in my sidebar!!