Showing posts with label embossing. Show all posts

Monday, February 1, 2010

CHA Winter 2010 Projects: Gifts from the Kitchen & Fourth of July

I just saw this sitting in my post lineup - in draft mode, I didn't even realize it hadn't posted!

I'm so excited to finally get to share the projects that I created for the Provo Craft booth at CHA this past weekend. Thank you so much Provo Craft for the chance to work with you! Thank you also to Maggie for all the help you give us and for representing the entire team at CHA! I would also like to send out a sincere thank you to Provo Craft for the chance to work with the new folders, Coredinations for their sponsorship and providing cardstock and to Adornit for the great patterned papers you sent to design with as well!
♥♥♥♥♥♥♥♥♥♥♥♥♥♥♥♥♥♥♥♥♥♥♥♥♥♥♥♥♥♥♥♥♥♥♥♥♥♥♥♥♥♥♥♥♥♥♥♥♥♥♥♥♥♥♥♥♥♥♥♥♥♥♥♥♥

Maggie asked me to create projects in two themes: Fourth of July and Gifts from the Kitchen.  I'm going to start with my Gifts from the Kitchen sets.

When she asked me to create some items to fit this theme I knew right away what I wanted to do! My first project is for Firecrackers! My mom made this at Christmas this year and they have been an instant hit with the family! My husband is a big fan and we've made several batches since the holidays. They are very easy and a great snack!
I really wanted the firecrackers to show through and so I found this box that they could stack nicely and neatly in (I hope they traveled well) and then just made a simple band to wrap around the middle. I embossed some red Coredinations paper using one of the new Asian folders debuting at CHA. I opted not to sand on this project and just let the design remain very crisp. The sentiment was generated on my computer and punched out; there are so many you could use with this recipe - "You're on Fire!" "You're Hot!" - you get the idea! The firecrackers were sooo simple! I just took some metallic pipe cleaners, cut them down and rolled them up in some of that Adornit patterned paper.
Supply List: Asian embossing folders (Provo Craft), cardstock (Coredinations), patterned paper (Adornit), punch & ribbon (Stampin' Up!), glue dots, red sticky tape, pipe cleaners, box - I found at the comic book store.

Firecrackers Recipe:
1 box of unsalted saltine crackers (we prefer the generic over the name brand for this)
1 1/2 c. of canola oil
3 Tablespoons of crushed red pepper flakes
1 packet Ranch Dressing mix

In a large sealable tub, place all the crackers. In a separate bowl, mix the remaining ingredients well. Pour over crackers. Seal and turn tub gently to coat crackers. Turn the tub every 15 minutes for an hour or so. Open tub and let air dry for a bit.

♥♥♥♥♥♥♥♥♥♥♥♥♥♥♥♥♥♥♥♥♥♥♥♥♥♥♥♥♥♥♥♥♥♥♥♥♥♥♥♥♥♥♥♥♥♥♥♥♥♥♥♥♥♥♥♥♥♥♥♥♥♥♥♥♥

My second Gift from the Kitchen was to make Teriyaki Walnuts. I packaged them in a box using a template from My Time Made Easy. I used two of the new Asian folders on this project and love how simple yet "wow" it looks! Since my box base was white, I sanded the Coredinations cardstock on this project to bring in some white on the decor as well. The box is kept closed with some velcro circles.
And then here's the back of the box; I think it's a nice touch to finish it all the way around.

Supply List: Asian embossing folders (Provo Craft), cardstock (Coredinations), patterned paper (Adornit), punch & ribbon (Stampin' Up!), red sticky tape, sanding block, velcro closure

♥♥♥♥♥♥♥♥♥♥♥♥♥♥♥♥♥♥♥♥♥♥♥♥♥♥♥♥♥♥♥♥♥♥♥♥♥♥♥♥♥♥♥♥♥♥♥♥♥♥♥♥♥♥♥♥♥♥♥♥♥♥♥♥♥

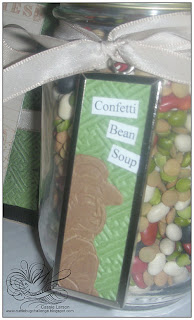
My final Gift from the Kitchen is a thank you gift for someone who's just been a great friend. There are tons of "gifts in a jar" recipes out there that are easy to put together. This is for Confetti Bean Soup. You are supposed to layer the beans which looks really nice. But I knew that they would get all mixed up in route to CHA so I just mixed them to begin with. I think it works since it's "confetti".
I kept the jar itself pretty simple - just an embossed circle to cover the top, some ribbon and a really neat tag. The embossing just looks so sharp in this little slide frame.
The card is more in-depth. I used another new Asian folder for the main embossing, again on Coredinations cardstock. Instead of sanding, I distressed by lightly inking the paper with some black ink and distressing the edges. The little sentiment panel uses a graphic from Crafty Secrets. The inside of the card features the instructions on a pull out card.

Supply List: Asian embossing folders (Provo Craft), cardstock (Coredinations), stickers (Making Memories), Crafty Secrets, frame & glass slides (Ranger), black ink, edge distresser (Heidi Swapp),
ribbon (Stampin' Up!), brads,
♥♥♥♥♥♥♥♥♥♥♥♥♥♥♥♥♥♥♥♥♥♥♥♥♥♥♥♥♥♥♥♥♥♥♥♥♥♥♥♥♥♥♥♥♥♥♥♥♥♥♥♥♥♥♥♥♥♥♥♥♥♥♥♥♥
Okay, now let's shift gears and jump ahead about 6 months. Fourth of July is one of my favorite holidays; I'm so proud to be an American - thankful too - and the patriotism that swells at that time of year just makes me happy!

The first project I'm going to share is a decorated insulated mug. I wanted to create a mug appropriate for a military wife - they sacrifice so much as well for our country. I'm incredibly grateful and thankful for the journey they take to support their husband as they do battle on my behalf.
That being said, this project gave me such grief. I  was literally like "Good Grief" (charlie brown).
What I have to share is the 3rd version of this project that I did.
I used some star printed paper on the bottom, embossed with the stars embossing folder and then brushed with white craft ink. The top had a blue patterned paper and then I cut up bits to create some sentiments.

Supply List: Stars embossing folders (Provo Craft), cardstock (Coredinations), patterned paper (Adornit), red sticky tape, insulated coffee mug
♥♥♥♥♥♥♥♥♥♥♥♥♥♥♥♥♥♥♥♥♥♥♥♥♥♥♥♥♥♥♥♥♥♥♥♥♥♥♥♥♥♥♥♥♥♥♥♥♥♥♥♥♥♥♥♥♥♥♥♥♥♥♥♥♥
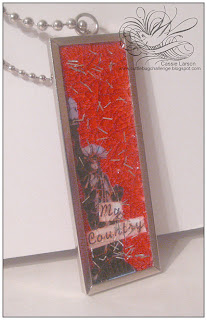
My next project is a jewelry piece that I created with another frame and glass slides from Ranger.
I embossed Coredinations paper, and then trimmed out the Statue of Liberty image from the Adornit paper. Computer generated sentiment. I layered that all on one glass slide and inserted in the frame. Then I covered it with some crackle medium --- which makes it very difficult to see the embossing in the photo now. While it was still wet I sprinkled in some glitter flakes I had to mimic fireworks!
This is the first project I've made with these materials and it was a lot of fun! Very easy and I can't wait to get some more frames!
Supply List: Asian embossing folders (Provo Craft), cardstock (Coredinations), patterned paper (Adornit), frame & glass slides & crackle medium (Ranger), glitter flakes, chain
♥♥♥♥♥♥♥♥♥♥♥♥♥♥♥♥♥♥♥♥♥♥♥♥♥♥♥♥♥♥♥♥♥♥♥♥♥♥♥♥♥♥♥♥♥♥♥♥♥♥♥♥♥♥♥♥♥♥♥♥♥♥♥♥♥
I picked up a wooden star box at Michaels. I thought it would be a wonderful little keepsake box for dog tags. The box was painted and then patterned paper cut to fit the top. I embossed it using just the swirls from the Koi embossing folder. You'll have to look close to see it as it flattened out quite a bit when I was adhering the paper to the top.

I also cut out some other icons and words from the Adornit paper to decorate the box - including a sentiment on the inside.


Supply List: embossing folder (Provo Craft), patterned paper (Adornit), acrylic paint, glue, dimensionals
♥♥♥♥♥♥♥♥♥♥♥♥♥♥♥♥♥♥♥♥♥♥♥♥♥♥♥♥♥♥♥♥♥♥♥♥♥♥♥♥♥♥♥♥♥♥♥♥♥♥♥♥♥♥♥♥♥♥♥♥♥♥♥♥♥
My final project is my favorite that I created: a decorated canvas. The shipping tags were embossed with the stars folder and trimmed in length a bit to fit the canvas. I looooove how those manila tags look embossed - it might be my new favorite thing to emboss!
I had some chipboard letters in my stash that I peeled the paper off of and recovered with the Adornit papers. I sponged some ink around the edges to distress them a little bit. For the fourth tag, I cut out a star and embossed it with the swiss dots folder. I sanded them as I really wanted them to stand out. Using a sentiment trimmed from the paper and button and twine I decorated the star for a little fancy ending!


Supply List: embossing folders (Provo Craft), patterned paper (Adornit), cardstock (Coredinations), manila shipping tags, dimensionals, button, thread, paint, sanding block, canvas
♥♥♥♥♥♥♥♥♥♥♥♥♥♥♥♥♥♥♥♥♥♥♥♥♥♥♥♥♥♥♥♥♥♥♥♥♥♥♥♥♥♥♥♥♥♥♥♥♥♥♥♥♥♥♥♥♥♥♥♥♥♥♥♥♥
If you've read this far - THANK YOU! There was a lot to share and I am so appreciative that you take the time to visit - please leave a comment letting me know what you think! Which project is your favorite?

Wednesday, August 19, 2009

Cuttlebug Be Inspired Challenge 45: Shaped Cards

This week's challenge at the Cuttlebug Challenge was to get creative and create a SHAPED card! This could have been quite a difficult challenge if it were not for our sponsor this week: Paper Popsicles. Melissa has a TON of different shaped templates that you can use to create cards!

I needed a masculine card for my Dad's birthday so I chose to work with the truck shape. I have many fond memories of my Dad's truck from growing up. It was an old GMC that was once red but the whole time it was in our family it had faded to a pale orange color. Donuts in parking lots during snowstorms, shivering in the winter as he drove me to basketball practice at ohmygoshitissoearlyanddarkstill:thirty, taking the humps on a street not far from our house so that we really bounced in the seat. Ah - good times!

I hope he sees the similarities when he opens his card!

I used the Diamond Plate to emboss the body of the truck and the Spots and Dots for the wheels. I used some Black Magic Coredinations for the card - first cutting it out for the base with the black on the outside and the orange on the inside. Then I cut another truck with the orange on the outside and trimmed out the wheel wells. I could've sanded but decided to just rub an ink pad over my embossing to have it really stand out. I also didn't sand the wheels but the embossing is deep enough that it brought some color through the black anyway! A few buttons and some silver creamy stuff finished it off!

Please go by the Cuttlebug Challenge blog to see the rest of the teams creations. There are a variety of the templates for you to see. You can view the entire line of Paper Popsicles Shaped Templates in the store. For only 99 cents, they are totally worth the time it would save me to try to sketch my own out!

Be sure to load up your shaped card over at Cuttlebug Challenge for a chance to win this week's prize, courtesy of Paper Popsicles!! And I've got one final card for today!

Flutter By Wednesday: A CASE study

Wednesday again and I have 3 projects to share with you today! First up is my Flutter By card for today. I get to play hostess this week and it was so fun to think up the challenge for this week! I love being a part of this team - it's so fun to be surrounded by such talent!! So I challenged the gals to CASE a Flutter By project from another teammate.

Seemed easy - until it came time to decide just WHICH card to case!! LOL!! I am horrible at making decisions --- so I took the easy way out and have included more than one CASE in my card for this week!

First, I used a color combo by Kim (here's hers) of blue, brown and just a touch of green. Boy that touch of green really threw me but I managed to get it in! You might just see another bit of inspiration from her on how I used my butterfly!
Then I loved the button that Harriet used on the center of her butterflies on this card here so I knew I wanted to use that touch!
And then the big CASE was one of Ann's cards - I loved the layout! I used a die cut butterfly instead of a stamp and a patterned ribbon instead of a solid one. I also didn't have patterned paper so I created some with my embossing folders!


Be sure to visit the rest of the team and see how they took on this challenge!!
And be sure to hang around and see my other posts for today!! ~Cassie

Wednesday, April 8, 2009

Cuttlebug Be Inspired Challenge 26: Easter & Vellum are a Perfect Pair

Wednesday is one of my favorite days of the week! I always love the inspiration I get from the other gals on the cuttlebug team and I love seeing what all our readers create too! Plus it's also Flutter By day and Pink Papery day. It's a GOOD DAY!!!!


First, in case you didn't see yesterday's post - be sure to check out the promo below. The Cuttlebug Challenge team is gearing up for another weekend event. You do not want to miss it. Even though it's still almost a month away, make plans now to join us. We have some really awesome projects planned for you and tons of prizes --- TONS!!! I so hope you'll be able to join in on all the fun!


Yes, that is 3 machines!!


Now for today's card. Thanks so much to Crop Stop for being our sponsor this week. They are giving away a $5 gift certificate to TWO lucky winners. We were asked to create an Easter themed project and to incorporate vellum into our design as well. I remember the first time I embossed vellum in my cuttlebug was for a baby card for my sweet friend Suzann. I'll have to share it here sometime as it is one of my most favorite cards ever (ya'll *know* how much I love baby cards)!!!

There is just something so sweet, innocent, simple and yet stunning about vellum. My card features clear and pink vellum in 3 different spots.


The base is clear vellum embossed with the Textile embossing folder. I love the white look that you get. The vellum I used here is some I got ages ago. It's very lightweight and in some spots it seemed like the folder actually "cut" all the way through the vellum. You can't see it but I could feel it. I love the pressure that this little machine gives - esp. after a class I took this past weekend!! I wanted to keep my card fairly clean and simple - so I just faux-matted the focal layer. I used some chalk ink to add color to the edges and to stamp my sentiment (from 2RedBananas) It really shows up much better in real life.

Here is a detail shot of the top trimming. I scalloped some pretty green paper and then used another scallop punch on some clear vellum. I love how sweet and dainty it is. It is quickly becoming my favorite border punch! Then a row of pearls to finish it off.


And here are my pink vellum embossed bunnies. I actually punched them out of a scrap of vellum that had already been embossed. I couldn't resist adding a pearl for their little cottontails.
Be sure to swing by the Cuttlebug Challenge blog to see the rest of the team. Then visit their blogs for more details and to leave them some comment love on their project. I can't wait to see what all they have come up with!! We would love to see YOUR creation using vellum to create an Easter card! Add the direct link of your project to My Linky on the blog so we can all see it. Please use keyword CBI26 when uploading to online galleries so we can find it easily!
Our sponsor this week is Crop Stop - they are giving away a $5 gift certificate to TWO lucky winners this week!

I used Lauren's Saturday Sketch for my card - it's the first time I've played along in her sketch challenge. I thought the bunnies would just look really cute in this sketch!!
I should be back later in the day with my Pink Papery Studios card. In the meantime - Have a Beautiful Day!!

Wednesday, March 4, 2009

Be Inspired #21: Watercolor

It's Wednesday and you know what means - lots of posting here today!! Be sure to come back later and see my Flutter By and PPS creations. This week the Cuttlebug Challenge team was given the word "watercolor" as our assignment. I thought and thought. And then I thought some more. I finally knew what I wanted to do, sat down at my desk, and veered off course. This has been happening A LOT lately at my desk. I think sometimes art just comes out of you and there is no sense fighting it.
Isn't this a wonderful quote? Soooo true too! **It's from PMS (Paper Makeup Stamps - she has a sale on 2 sets that ends today! I picked up the Star Struck one and can't wait for it to arrive!)

I started off giving my watercolor paper a light wash in blue. It was very subtle. Then I ran it through the script embossing folder. Oh.My.Wow. (that's my new saying - hi Jacquie)
Watercolor paper embosses like a D.R.E.A.M. Then I highlighted the embossing by running my ink pad over it lightly. I uses a the same shade of ink to stamp my quote onto my patterned paper. It's Anna Griffin from my stash - I don't think it's possible to have enough of it - and tore the top edge. I also cut some flowers and leaves from the paper to use as an accent. The base was stamped in the same blue as well with a rose stamp. My butterfly was die cut and then embossed with the Textile embossing folder. I added stickles to the design and some in the flowers I cut out as well.
I got totally impatient waiting for them to dry so pulled out my heat gun to speed up the process. And in so doing, aged the edges of my paper. LOVE THAT!! Totally unexpected and I LOVE how it turned out!

Here is the view of the card standing up. It's just gorgeous in real life!
We'd love to see what you can do with your Cuttlebug and watercolor. Be sure to visit the Cuttlebug Challenge and leave the link to your project in Mr. Linky. I can't wait to see what you create! Be sure to visit the rest of the team too and see what they've come up with!


Tuesday, March 3, 2009

It's Tuesday Again, Let's Twinkle!

Good morning girls!! Are you having a great Tuesday? Things are pretty calm around here - for the moment!! Tuesdays are Madelynn's Twinkling Tuesdays where we get an Amazing Sketch from 8 year old Madelynn. And let me tell you - this week's was GREAT!! I love the little dots in the corner!!

My card turned out completely different from what I originally sat down to create. It was late and so I went in to create a really quick and easy card. I started with the sentiment segment of the card. A few years ago I ordered some flowers off ebay that were all assembled and put together. I don't remember what I paid but I remember thinking it was a steal when I got the box in. I have TONS of these flowers and so I knew I wanted to use one of them. Many of them have little sentiment tags hanging off the middle. I chose this one because I loved the colors. And brights are colors I don't use very often!
I colored my bird with my ink pads, some water and a Fantastix brush/pen/thing.... It was really nice because it has a sharp point so it was easy to control and get into the tiny spaces. I don't know if the coloring is true to a real bird in life, but I sure think it would be a pretty one if it were! I got a crazy idea to add a branch for my bird and then somehow in the middle of that, I dropped the oval mat and decided to cut out the entire branch from my embossed folder. So much for quick and easy! As I was cutting it out with my exacto blade I thought of all those gals that use to cut out those intricate scrapbook titles. Wowza - I knew they were amazing!! While I love the effect, I think I'll be looking for some sort of branch die cut for future use! I did flip the sketch twice for my layout.

Love the depth here. I adhered some of the leaves/stems with glue so they were flat and the other with dimensionals. Hopefully it looks like a real tree with overlapping branches. Some gems in the corner and one for the birds eye and this card was done!

As I looked at the completed card, I could see some of my dimensionals along the top edge and the white was just glaring!! So I took my Fantastix and my ink pad and colored the edges. It might be slightly O&C (obsessive & compulsive) but it just took a few seconds and really polished it off!
Thanks so much for visiting today! I just love it that stop by! I hope you have a beautiful day today. Do stop by the rest of the Twinkle Team and see their cards - I can't wait to see them myself!! And Heather is our featured Twinkie this week over on the Twinkling Tuesdays blog! As always, we want you to join us. Please use code MTTSC12 when uploading your card to an online gallery. Or leave us a link to your blog post by leaving the link on the Twinkling Tuesdays blog! Here are the links to the rest of the girls blogs! We welcome Darla this week to our team! She's very special as she introduced Madelynn's mommy Jessica to stamping and so you might say that we wouldn't be here today without her influence!!!

Wednesday, February 18, 2009

Cuttlebug Be Inspired Challenge 19: Emboss Acetate BONUS

Hi girls!! Can you believe it's Wednesday already? I was really excited about our challenge this week over at The Cuttlebug Challenge blog. Embossing acetate has been on my "want to try" list. I wanted to make something that could be a gift/decor item and am totally in love with what I came up with!
I combined my Cuttlebug Challenge with this weeks Flutter By challenge where we were to use blues and purples in our card.

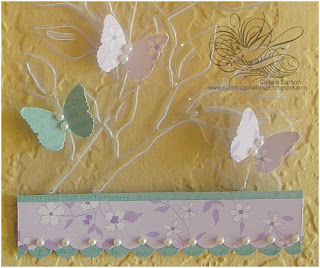
I cut my acetate down to fit in my folder and then ran it through using the Leafy Branch folder. I used a Baja Breeze scrap stamped with some text in Baja Breeze and some purple patterned paper from a DCWV mat stack to punch out some butterflies. I bent up the wings and placed them on my plaque using glue dots and accenting with pearls. The bottom trim was created with my Stampin Up scallop punch and then accented with pearls as well.

Here's a shot of it hanging on my wall:


I punched two holes in the top with my CropADile and set some eyelets in for reinforcement. The ribbon is actually some vintage seam binding I picked up at an estate sale.


Be sure to visit The Cuttlebug Challenge blog to see the rest of the design team cards and then visit them to leave them some love. We'd love to have you participate as well, so use the Mr Linky widget on the blog to let us know where to view your card!

And don't forget about the rest of the FlutterBy girls either! Their links are over in my sidebar and I know they'd be thrilled to have you stop by for a visit!!

Wednesday, February 11, 2009

Cuttlebug Be Inspired Challenge 18: Shaped Cards


Hi Girls!! Oh, I've missed you!! Have you missed me? Lie and just say yes!!! Had such a wonderful time at my in-laws. My SIL cranked out these gorgeous crocheted flowers - like 29 of them in all for shower favors. I stamped and embossed some little cards to mount them on. They looked so pretty on the table and I think everyone loved them. I know I love the 2 I brought home! My MIL took care of the other details like cake and punch and flowers. I am really glad that we made the effort to throw the shower for my other SIL. It won't be long until I'll have a nephew - well, I already have a nephew and niece but this is one that I'll know from the time he's born! Anyway, you know what I mean, right???? He'll be a gift from God - aren't they all???

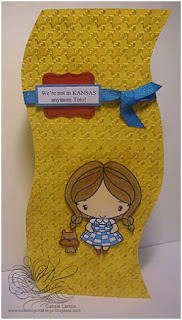
I didn't get much stamping done in the last week and so it's nice to be home and back at it. The first project I worked on was this weeks Cuttlebug Be Inspired #18 Challenge. We were to create a shaped card this week. When I sat down at my desk, I had lots of ideas: heart, flower, baby bottle and then I spied little miss Anya was peeking out at me. I had another digi Dorothy Anya printed off and thought I would use her. Since I spent part of my time in Kansas and saw lots of "Dorothy" and "Wizard of Oz" references at the travel stop, I was inspired to pick her up.


I used a Summer Sun base cut to 4 3/8 x 9 that I then ran through the Houndstooth embossing folder in my Cuttlebug machine. Using a sponge, I aged it with Vintage Photo Distress Ink and then with a Gold Encore pad. I also trimmed it to resemble a rambling, curvy road. Miss Anya and Toto were colored with my Copics and Prismacolor pencils. I created my own sentiment and mounted it with my Curly Label punch from Stampin Up! Cherry Red glitter was added to her slippers and the edge of the punch. I hope you enjoy it!

Be sure to stop by the Cuttlebug Challenge blog and see the creations from the rest of the team!

I'll be working on slowly catching up with visiting each of you this week as well. Thanks for coming by today! I so enjoyed getting to spend some time with you! If you participate in any of these challenges, be sure to let me know as I'd love to visit and see what you created!

Have a beautiful day girls!!


Wednesday, February 4, 2009

{hi} friends!

Hi again! Are you having a great day? When this posts, I'll be in the car, hopefully with a calm little man. The last time he got in my BIL's car he screamed bloody murder. If you pray, please pray for a calm little man on Wednesday.
Today is a special Wednesday for me because it's my first post as a member of Danni's Flutter By Wednesdays. Danni loves butterflies and she loves making cards so every Wednesday she creates cards with butterflies. I've been getting to know her over the past few months and she is a dear friend. The computer seems to shrink miles and there are times when I forget that I can't just "get together" with all my stamping friends. Hopefully though Danni and I will be able to visit face-to-face someday soon! She emailed me last week and asked me to join her team. I was sooo honored and am thrilled to get to work with this bunch of girls! {hi girls! - i've been super busy but i promise i'll be back in a week and it'll be more normal and i'll be around visiting and getting to know ya'll better}. I did tell Danni that I don't have a ton of butterfly stamps/punches so if she was okay seeing the same ones over and over, I would be thrilled to join!

I made this card right after I made my Anya card posted yesterday. I spent forever on that card and my brain needed something quick and easy. Even though this came together in no time at all, I still l.o.v.e. it!! I embossed the base of my card with Swiss Dots (anybody surprised?). The butterfly is actually this stamp:


Yep - a leaf! I just inked it carefully so as not to catch the stem. His path is pierced and it totally becomes believable. Be sure to stop by the rest of the girl's blogs and leave them some love! I can't wait to see what they've come up with this week!
Thanks for stopping by today! Since I won't be stamping any the rest of the week (and won't have housework either), I should have some time to visit all of you. Can't wait to see what everyone has been up to! Have a beautiful day! Oh - and if you haven't seen the Mom tip for today - oh my goodness. SUCH a good one!

Pomegranate Valentini

Hi girls! It's Tuesday night and I'm scheduling my posts for tomorrow. I am sooo tired and ready for bed. And soooo thankful that I don't have to drive tomorrow. I do hope it's a pleasant drive for the little man. Since it's Wednesday, I have lots of cards to share with you today; normally it's 3 but I checked the Cuttlebug Challenge assignment (create a "love" card/project) for this week and saw that I could easily combine it with the Pink Papery Studios challenge (a sketch by our very own Valerie with bonus points for using the colors red, black and white).


Isn't it a great sketch? I used my Cuttlebug to emboss the hearts background (I just inserted my folded card into the folder and both the front and back of my card are embossed. Cool huh?) I also used the green machine to cut out the image and the scalloped mat using my Nestabilities. The image is one of the new Valentine digital images from Pink Papery Studios. It's only $2.00 and you'll get it instantly to your computer - talk about instant gratification!! You can find it plus all the other images HERE. I colored it with markers, ink and blender pen and a silver gel pen. I also used my Pixie Shimmer It to add sparkle to the 'tini part and also all along the red scalloped mat. It's really sparkly in real life! Three red gems and a pretty red bow finish it off.

Be sure to check out all the other PPS girls blogs today too! Lindsay is offering blog candy so definitely stop by and see her. We'd love to see what card you create with this sketch and or the colors of red, black and white. Load it up at PCP or SCS using the keyword: pinkpaperystudios so we can all check it out!!
Amy
Lindsay
Kimberlee
Ami
Jennifer
Shelly
Valerie

Also be sure to head over to The Cuttlebug Challenge blog to see all the wonderful cards by the team over there! We are still so excited about the Luv Bug event. THANK YOU for making it such a fun weekend!! Boy, are there some awesome exciting things that are going to be happening over there in the coming months!! You won't want to miss it so head over and follow the blog or subscribe or add it to your reader!!

Have a Wonderful, Beautiful Wednesday!! I am so excited to go see my in-laws and spend some time up there. Saturday we have a baby shower for my SIL and that should be lots of fun too - you know how I LOVE to make baby cards!! Well, gotta type one more post and then go pack. I did not get other projects photographed to share so I will just see ya'll back here next week!!

**I'm so tired I JUST realized I was writing this to post on the PPS DT blog - ugh! Really glad I caught it before I shut down!

Tuesday, December 30, 2008

A Fresh Take on Scraps

Hi girls!! It's Tuesday and that means it's time for another Twinkling Tuesday Sketch by Madelynn. I was able to stamp with my good girlfriend on Saturday (Hey Girlfriend!) and had lots of little snips left over from the ATC's I made. I decided to put them to use and used them in my card for this week's sketch.


I still love the Fresh Cuts set and I hadn't used it in a long time. I used Cameo Coral with touches of Old Olive and little Banana to accent. Can you tell from my photo that I used a standard sized card but have it opening from the short side? A little different, but nice I think. I used 2 different cuttlebug folders on this card and popped up the main image panel as well as the whole panel on the chocolate chip base.

Be sure to stop by the rest of the Twinkle Team and see what they came up with using Madelynn's sketch. Bonnie at The Lucky Clucker is our featured Twinklette this week so be sure to visit her. The rest of the links are in my sidebar.

Also, we'd love for you to play along with us. Please use keyword MTTSC3 when uploading and then be sure to leave a comment on Jessica's blog so we can all stop by and take a look. I hear there is Blog Candy involved this week so be sure to give this one a try!
Have a beautiful day!! I'll see you tomorrow for another Pink Papery Studio challenge too! It also involves scraps!!


Tuesday, December 23, 2008

A Criss-Crossed Love


It's Tuesday and my first official post as part of Madelynn's Twinkle Team! The sketch this week was a doozy. I did pack a small bag of stamping supplies to bring to my in-laws of some very basic and loved items. I think the Tres Chic background is very versatile and can go with just about anything. It's also a great way to add texture when stamping with the same color.

I apologize for the poor picture quality. It has been grey and c-o-l-d here since we arrived and there is no Photoshop here for editing purposes. I did use a free online service - Foto Flexer - and managed to make the photo look better than it originally did. I know that's not saying much since the lighting is still so poor. It's really pretty in real life. The base is chocolate chip stamped in chocolate chip. I used Mellow Moss ribbon for my crisscross section and some green cs that I ran through my cuttlebug and my scallop punch for the middle bit. I think it might be Old Olive? I wish you could see the heart in real life - it's SOOOO PRETTY!! I was originally going to have lots of colors on the heart and used my markers to achieve that. Once I stamped it I wasn't too happy with it so I cleaned my stamp and just inked it up with pink. The second stamping came out so cool as it is pink and brown all variegated together. I'm not sure if it's because my stamp wasn't clean enough or if some brown ink contaminated my pink marker but I love the look. I really think it's the marker and I'll buy a new pink one and keep this "ruined" one for the effect.


The original sketch has the sentiment on the left but I switched mine to the right as the word "love" was perfectly positioned. I wanted it to stand out more so I went over it with my white gel pen and added the other 2 words. By incorporating the scallops, ribbon and a sentiment with 3 words or more I can also count this card as one of the Holiday Challenges over at SCS.


Thanks so much for looking! Be sure to check out the rest of the Twinkling Team to see their take on this week's sketch! The links can all be found in my sidebar!!! I promise to take new pictures when I get home so you can see the pretty heart!! Thanks for stopping by!
Have a beautiful day!!

Friday, December 19, 2008

I Can't Stop Smiling

I wanted to share with you one of the cards I made with my sister and some other friends a few weeks ago. I picked up the peach element in the dollar section at JoAnn's back in October. It is completely covered in glitter. I know it looks shiny and smooth in the photo, but it's just raw, chunky, sparkly glitter. I was looking at the peace (pun intended) I thought about one of my favorite card artists and how she had been layering buttons on her cards. I wanted to achieve the same thing and have a card with some pretty stuff on it but nothing that would detract from the message.

Peace is what I hope you find in the coming days as Christmas quickly approaches. Peace is what I hope you find in the new year and all throughout 2009.

Thank you so much for stopping by and visiting my blog. Your visits and your sweet comments make my day!

And finally, I wanted to share with you why I have been grinning and floating for the past 2 days. First, a major goal of mine was realized this week. I had a card picked up for publication - this has just rocked my world!!! I am so excited and honestly, still in shock....I didn't expect to be able to say that I had met this goal this year. Granted it won't be out for months and months but still - I got the acceptance this year! Anyway, I knew you would understand my joy.

Another reason I'm floating this week is because I have been honored to be included as part of the Twinkle Team (more info here). I am so excited to be a part of this. In case you aren't familiar with this brand new sketch challenge, here's some info. Jessica, The Whimsical Butterfly is a fellow DT member for Pink Papery Studios. I have really enjoyed getting to know her over the last month. Her daughter sits near her and doodles and sketches while Jessica stamps (how cool is that?). Earlier this week, she created a card sketch for her mom to use; the sketch's will continue every Tuesday. I'm so excited about this because I love kids being interested in any artistic endeavor, be in drawing, painting, sculpting, whatever. My grandma was very talented and her home was filled with paintings that she did. I was always in awe of her ability. Now, I can't really draw much beyond a doodle and I grew up thinking that I wasn't any good at art and didn't have any creativity. My only claim to fame was my excellent penmanship (which completely got destroyed in college - why couldn't they have had laptops back then). It wasn't until I was a newlywed that I discovered stamping and it was like all this creativity just gushed out of me, as if a dam had been broken. I am so thankful to have the skills and talent that God has given me, thankful for the resources that I've been blessed with to continue to develop them, thankful for the friendships that have blessed my life as a result of stamping. There are times when I wish that I had known as a child that I had an artist inside me, that she had been freed years ago. And that's why I love it when kids get excited about creating - anything - stuff - whatever it is.

Anyway, this has gotten to be incredibly long and if you've stuck with me this long, then thank you. And know that you bless me everyday - and I hope to do the same for you!

Have a beautiful day!!

Wednesday, December 17, 2008

Glistening Pink Snow

I just want to say thank you so much to each of you who have lifted me up this past week with your visit and your sweet comments. Last week was a rough one for me - nothing major or chaotic - just some low spirits and your friendship seriously made me smile and feel all warm and fuzzy. I also LOVE IT that you love the bow. Wish I could take credit for it - but I bought it that way. In Walmart. They also have it in a Gorgeous Burgundy color.

Now if you've been here before, you know that my sister fell in love with a purple tree. A few years ago I saw a really pretty pink feather tree and promptly added it to my wish list. It's still there. But I love the color pink and I love how Christmas can be represented in so many non-traditional colors these days. And in a magical world, snowflakes might fall in bright pink and green!

Jami challenged the Pink Papery Studios DT this week to create our own decorative paper using stamps. I used the snowflake from the Catch a Falling Snowflake set. I even stamped and embossed some with this pink glitter embossing powder I have from Judikins. They have the prettiest colors of embossing powders! I had to take a photo to show you since most of it is getting covered up. Can you see the sparkle? Very cool IMO!! (Look close, you'll see a sneak of another card I have to show you too - probably one of my all-time favorites!) ((And yes, I know I say that a lot, but that's what happens when we keep creating right, we love the next project and then the next.))

I also used the tree image from the Simply Christmas set. The Between Us Girls line is one of my favorites!! I have the digital version of this stamp set so it took me awhile to finagle this card. I used the lasso tool in PS to just capture my tree and then pasted so that I had 2 side by side. I printed out a 3rd tree separately. I also wanted to paper piece my trees - you can see a tutorial on digi paper piecing here.I finished it off with even more falling snow on my main panel, a snippet of ribbon and sparkly gems in the corners. I almost left off the ribbon and the gems. Do you think it's too much?

Have a beautiful day!! And stop by the other girls blogs - their cards are A.M.A.Z.I.N.G.

p.s. hubby just called to tell me I have to leave NOW to meet the family for dinner (yea, with a baby napping and all that goes to get them out the door....please commiserate with me!) So I'll work on editing my other card later and get it posted.

Saturday, December 13, 2008

Pumpkin Thanks


I know everyone is posting holiday cards around blogland but I wanted to share this one. It's one of my most favorite cards ever!! I created it to submit for publication and alas, it didn't get picked up. :( I found the ribbon first, already made into this scrumptious bow and snapped it up right away. One thing you can't see in the photo is the base has been embossed with the textile CB folder.
Have a wonderful Saturday. I convinced hubby he should take the little one with him to the gun show so I could get ready in peace this morning. I'm off to finish that up before I head out for the day.

Thursday, November 20, 2008


Thanks so much for coming back today to check out my fourth card featuring grey and red in honor Diabetes Awareness Month. I've so enjoyed hearing from each of you and your stories that you've shared.


I was going to create my card for today's post last night, but ended up working instead. So when I went in this morning, I was thinking I was either going to use Rain or Shine from MFT or Live Your Dream from Stampin Up. I even came in to the computer to look up the What's Up Wednesday Challenge. But when I went back in and sat down, I just got pulled into a completely different direction.


I have had this stamp for years and I think it's a quote we all have seen before. It is very true I believe and it just called to me. Such beautiful typography needs beautiful paper so I dug into my paper stash. My red today is not a bright red but more muted, almost burgundy in nature. I think the paper might be Anna Griffin but I could be wrong. I embossed the sentiment using Versamark, Basic Grey ink and clear embossing powder. That was the "hardest" part of the card? Are you like me and just in awe every time you emboss? It never gets old watching it turn. I remember the FIRST time I saw embossing: I was in college and one my roommates was an art major and she embossed something using OUR STOVE!!! I remember thinking she was crazy and watching her carefully just in case she set the place on fire!

I hope you are warmer where you are than here. A cold front blew in and it's FREEZING!! I mean, it's like 47 degrees outside, but that's cold here!!! I am going to run and start a load of laundry and curl my hair. I am subbing in my friend's Keno group tonight. Wish me luck that I win ... preferably the CASH PRIZE!!
Have a beautiful day!! All of the stamping friends that visit me each day, your praise and support are parts of MY BEAUTIFUL DAY!!

Wednesday, November 12, 2008

Autumn Appreciation


Hi everyone!! Can you believe it is Wednesday already? It's been gorgeous fall weather here; I'd love to have fall year-round!
Today I have my Pink Papery Studios card to share with you. Lindsay challenged the design team to create a "bargain" card, using items that are inexpensive. I found the ribbons in the Target $pot and wanted to use them somehow. The stamp is from a new set over at Pink Papery Studios. I think it is designed as a "green" stamp since the sentiments are "Be Green", "Grow" and "Just Breathe". I do try to conserve and not be wasteful, but I'm not really a gal that's into all that "green" stuff. But this tree can be used in so many ways - from fall to spring.
I used the SC202 sketch on SCS for my layout and 2 cuttlebug folders to add texture. I don't think you can see them, but I used the swirl folder on the pumpkin panel to simulate wind and then the polka dot on the bottom squares just because it's my favorite!! Lots of distressing too. I'll be sending this to my sister and her husband as a thank you for organizing our leaf-viewing trip a few weeks ago. Better late than never, right? I'll scent it with Candy Corn card-scent before I mail it later today!
I'd love to see what "bargain" card you create!! Please link it up here so I can check it out! Also, go see the rest of the design team and check out their cards. Plus, we have some guest designers that have joined us and their blogs are definitely worth a visit (links in the sidebar).
Have a beautiful day!! And do come back, I love sharing with you!! And I've really been up to a lot lately!!

Wednesday, October 22, 2008

Simply Sista's Showcase


It's Wednesday again!! This is one of my most favorite days of the week: it's in the middle, it's MDO day for the little man which means it's lots of crafty time for me!! First, I want to announce the winner of the first Simply Sista's challenge I posted last week: Janna from Stamps, Paper, Glitter, Oh My! Congrats girl!!

Our challenge this week was to use one of the new digi images released this month for Halloween. Halloween is all about candy, right?!?! But candy is good any time of the year!! (I feel pretty silly writing that actually, as I don't eat candy really; in fact I recently threw out a bunch leftover from Valentines! I know, I know, I have sent you chocolate lovers into shock!! I'm sorry...please keep reading!) But anyway, candy is around us all year long!! So I wanted to showcase this set as a great set to use year-round!! When I saw the sketch challenge last week at SCS I knew immediately what I wanted to do with it. So I've fiddled around with this card all week. I finally went and bought a circle cutter to help. I opted for the Martha Stewart one and I'm pretty happy with it so far. Not so happy with how I cut my circles in half, but I haven't figured out a way to blame that on anyone but me!! *wink*
I did use Diamond Glaze on my pieces of candy to make them super shiny and popped all the pieces up on dimensionals. I used a corner rounder on my circle and printed off the sentiment for the perfect coordination! You can shop for these digi images at Card Scents. If you play along in our challenge, please leave a link here so I can check it out!!
As always, have a beautiful day!!